November 6, 2011
The previous blog post introduced PixItHandler, a custom HTTP handler for ASP.NET. The handler responds to HTTP POST requests containing a JSON description of a 8-bit style image with an actual PNG image. Provided you know the expected JSON format, it’s pretty easy to use a tool like Fiddler (or cURL for that matter) to generate renderings of your favorite retro game characters. However, while you might (and should) find those tools on the machine of a web developer, they have somewhat limited penetration among more conventional users. Web browsers have better reach, if you will.
So a challenge remains before the PixItHandler is ready to take over the world. Say we wanted to include a pix-it image in a regular HTML page? That is, we would like the user to make the request from a plain ol’ web browser, and use it to display the resulting image to the user. We can’t just use an HTML img tag as we normally would, since it issues an HTTP GET request for the resource specified in the src attribute. Moreover, we lack a way of including the JSON payload with the request. We can use another approach though. Using JQuery, we can issue the appropriate POST request with the JSON payload to the HTTP handler. So that means we’re halfway there.
We’re not quite done, though. We still need to figure out what to do with the response. The HTTP response from the PixItHandler is a binary file - it’s not something you can easily inject into the DOM for rendering. So that’s our next challenge.
Luckily, a little-known HTML feature called the data URI scheme comes to the rescue! Basically, data URIs allow you to jam a blob of binary data representing a resource in where you’d normally put the URI for that resource. So in our case, we can use a data URI in the src attribute of our img tag. To do so, we must base64-encode the PNG image and prefix it with some appropriate incantations identifying the text string as a data URI. Base64-encoding is straightforward to do, and there are JavaScript implementations you could steal right off the Internet. Good stuff.
You might think I’d declare victory at this point, but there’s one more obstacle in our way. Unfortunately, it seems that JQuery isn’t entirely happy funnelling the binary response through to us. Loading up binary data isn’t really the scenario the XMLHttpRequest object was designed to support, and so different browsers may or may not allow this to proceed smoothly. I haven’t really gone down to the bottom of the rabbit hole on this issue, because there’s a much simpler solution available: do the base64-encoding server side and pass the image data as text. So I’ve written a BixItHandler which is almost identical to the PixItHandler, except it base64-encodes the result before writing it to the response stream:
private static void WriteResponse(
  HttpResponse response,
  byte[] buffer)
{
   response.ContentType = "plain/text";
   response.Write(Convert.ToBase64String(buffer));
   response.Flush();
}
Problem solved! Now we can easily create an HTML page with some JQuery to showcase our pix-it images. Here’s one way to do it:
<html>
  <head>
    <title>Invaders!</title>
    <style type="text/css">
      .invader { visibility: hidden }
    </style>
  </head>
  <body>
    <div class="invader">#990000</div>
    <div class="invader">#009900</div>
    <div class="invader">#000099</div>
  </body>
  <script type="text/javascript"
          src="scripts/json2.js"></script>
  <script type="text/javascript"
          src="scripts/jquery-1.6.4.min.js"></script>
  <script type="text/javascript"
          src="scripts/pixit.js"></script>
  <script type="text/javascript">
    $(document).ready(PixIt.load);
  </script>
</html>
Not much going on in the HTML file, as you can see. Three innocuous-looking div‘s that aren’t even visible yet, that’s all. As you might imagine, they are just placeholders that our JavaScript code can work with. That’s where pixit.js comes in:
var PixIt = {
  load : function () {
    var j = {
      "pixelsWide": 13,
      "pixelsHigh": 10,
      "pixelSize": 8,
      "payload":
       [
         {
           "color": '#000000',
           "pixels":
           [
              [1, 5], [1, 6], [1, 7], [2, 4],
              [2, 5], [3, 1], [3, 3], [3, 4],
              [3, 5], [3, 6], [3, 7], [4, 2],
              [4, 3], [4, 5], [4, 6], [4, 8],
              [5, 3], [5, 4], [5, 5], [5, 6],
              [5, 8], [6, 3], [6, 4], [6, 5],
              [6, 6], [7, 3], [7, 4], [7, 5],
              [7, 6], [7, 8], [8, 2], [8, 3],
              [8, 5], [8, 6], [8, 8], [9, 1],
              [9, 3], [9, 4], [9, 5], [9, 6],
              [9, 7], [10, 4], [10, 5],
              [11, 5], [11, 6], [11, 7]
           ]
         }
       ]
    };

    $('div.invader').each(function (index) {
      var inv = $(this);
      j.payload[0].color = inv.text();
      $.ajax({
        type: 'POST',
        url: "http://localhost:52984/bix.it",
        contentType: "application/json; charset=utf-8",
        accepts: "plain/text",
        dataType: "text",
        data: JSON.stringify(j),
        success: function (d) {
          var src = "data:image/png;base64," + d;
          inv.html('<img src="' + src + '"/>');
          inv.css('visibility', 'visible');
        }
      });
    });
  }
}
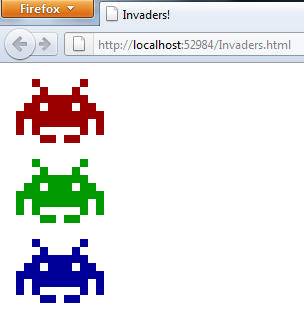
As you can see, we define the basic outline for a space invader as static JSON data in the script. For each of the div tags, we hijack the color code inside and use that to override the color for the space invader. Then we issue the POST request to our brand new BixItHandler, which has been configured to capture requests aimed at the bix.it virtual resource. The response is a base64-encoded PNG file, which we then insert into the src attribute of an img element that we conjure up on the fly.
And how does it look?
